
Charli Marie
logo cleanup and animation
Project goals
- give the design direction of the channel even more legitimacy with a killer logo/animation
- clean up the current logo
- give it a boost of life with animation (potentially similar in style to the Austin Saylor animation)
Logo before and after

Before

After
The focus on the logo clean up was smoothing out the curves and working on the line weight of the letters. I achieved this by reducing the number of anchor points and keeping them primarily on the extreme parts of the curves (top, left, bottom, right).
For the "a" and "r", I did some hand lettering on paper to work out a form that would match the whole piece really well.
I brought the first leg of the "M" up to the baseline for a few reasons. The flourish/underline from the M felt really good tucked in a little tighter to the baseline. The M has enough visual weight with the flourish and it's height to match the size of the "C".
Logo animation

The original Charli Marie animation was a write on animation that took place over 2 seconds. It was a well executed animation, but lacked some flare. What I did for this animation was imagine each letter having a specific set of characteristics. The main words I came up with for these characteristics were fun, lively, and bouncy. I experimented with less extreme versions of these characteristics and more extreme version. Ultimately, the above animation felt like the right balance of bounce, speed, timing, and flow.
Transition to title screen

The transition is built to look smooth and natural, as well as easy to implement for each new video. In the After Effects deliverable, all you have to do is import the Illustrator file and drop it into the comp titled [ PLACE TITLE GRAPHIC HERE ].
Background colors
I built the background color-change with the four colors you currently use on your YouTube channel. This setup allows for many options.
- If you want to use purple for the background and have it transition to blue, turn the "Purple" layer's eyeball on and the others off. Then turn the "Transition to Blue" layer's eyeball on and the others off.
- If you want it to be transparent for logo animation, but you want color to transition in, turn all the background color layers' eyeballs off.
- Don't put a background color in the Title Graphic itself. This would cover up the Charli Marie that gets small.
- You could also change the opacity of the background colors to allow video clips to show through a bit.
Fill effect on Logo Animation and Title Graphic
I put a Fill effect on the [ Logo Animation ] and [ PUT TITLE GRAPHIC HERE ] compositions in the Logo Animation + Title Graphic comp as an easy way to change the color of the graphics without leaving After Effects. You can change the fill to give the graphic the desired color, or just delete the effect and choose the color of the graphics in Illustrator.
Getting the animation into Premiere Pro
I know you're familiar with After Effects, but I thought I'd write out two ways you can get the animation into your Premiere file in case that's helpful. I prefer #1, but #2 might suit your workflow better.
1. Import After Effects/comp into Premiere
- In Premiere, File > Import > select After Effects file > select comp
- The nice part about this is if you change the comp in After Effects, it updates in Premiere automatically.
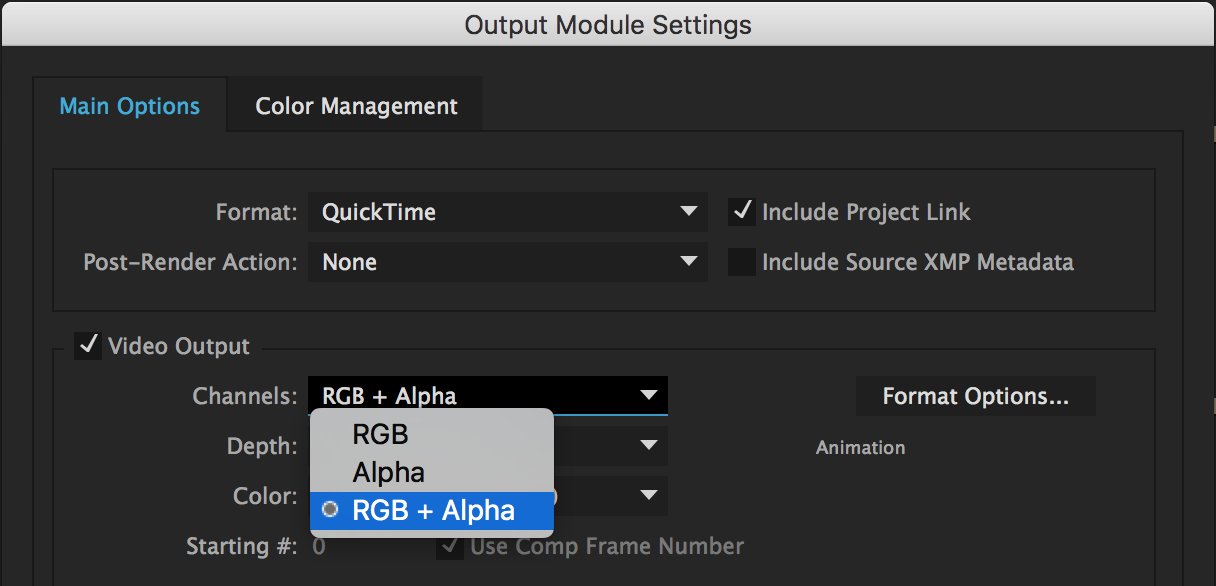
2. Render the comp as .mov with transparency
- Composition > Add to Render Queue
- Output Module > Video Output > Channels > RGB + Alpha
Deliverables
In this download, you'll find the following:
- Illustrator file of the logo
- After Effects file
- Looping GIF
- Non-looping GIF
- Transparent .mov of the animation in white
- Transparent .mov of the animation in black