
Graph Editor Basics
We're looking at the Value Graph. There's also a speed graph, but that's a tricky beast to be covered at another time.
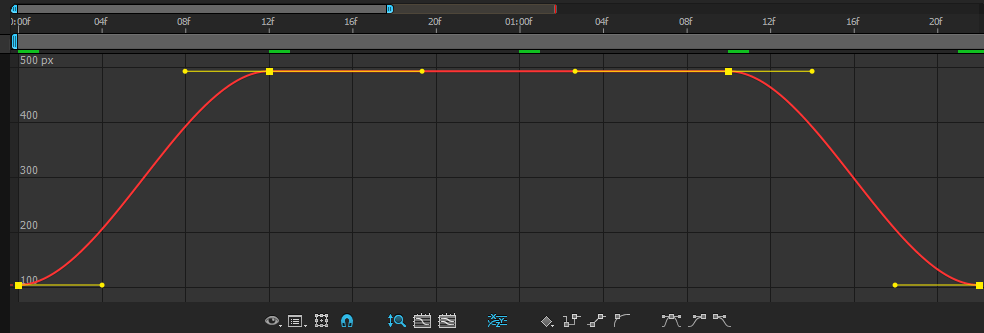
Keyframes from the timeline show up in the graph editor and the line shows the "in-betweens". The keyframe's location on the y-axis indicates the value of the property it's attached to (ie. Scale, Position, Rotation, etc.). The line indicates the value at any particular frame in-between the keyframes.
1. Easy Ease
Put something in your composition, a shape layer, .ai file, whatever. It doesn't really matter what. Hit "P" to pull up Position (or toggle the arrow down) and make sure you right click Position > Separate Dimensions. Set two keyframes and move the object from left to right. If you're feeling crazy, make it move back to where it started. Select both keyframes and Easy Ease them by hitting F9 (or right-click the keyframe > Keyframe Assistant > Easy Ease). Now hit Shift + F3 to open the graph editor (or click the graph icon).
You'll see a soft "S" curve. This is tons better than not putting any ease on an animation. Easy Ease isn't a magic bullet, though. If you really want to make your animations feel like butter, you gotta get into the graph editor and push and pull those bezier handles.
Think of Easy Ease as a set of training wheels.
You should dig deeper and make your animations move like you want them to. Touch every keyframe! Make it yours.

2. Extreme Ease
Now grab those bezier handles and yank them to make that a more pronounced "S." The steeper the line, the faster your object will move in the middle.
Use Extreme Ease to make a smooth, yet snappy movement.
Flat Line = Slow
Steep Line = Fast


3. Explode Out (& Ease In)
Now take that first keyframe and pull the handle skyward. The steep angle will explode out from the start and ease to a stop.


4. Ease Out and Accelerate Into the Wall
Ease out and keep accelerating till you get to the end. This is also a good curve to make something fall (just use the Y Position instead of the X Position).


This is just the beginning. But it's a great start. The graph editor may be daunting, or it may make perfect sense (if you have a particularly mathematical brain). It scared me when I first opened it and I like math and graphs.
Make sure you touch every keyframe and learn how to take control of how your animations move.
Keyboard Shortcuts Mentioned
F9 turns any keyframe into an Easy Ease (do this to initially get bezier handles.. make sure you tweak each one till it's right)
Shift + F3 enters and exits the graph editor
THE NEXT STEP ➠
Sign up for the newsletter to get the Motion Design Starter Kit and more After Effects tips in your inbox.